
Arts Education
Activity 1. Building a robot
In this first activity will build a robot dog with recycled materials

Materials that you need to make a robot:
• A cardboard boxes
• The inside of rolls of paper
• Paper albal
• Glue
• Colored transparent paper
• Fabric
• Rope
• Paper
To start you have to wrap the large box paper and cloth. This will be the body of the robot dog. Then tied a few pieces of rope behind which is the tail. Then the head is made with a smaller box where you cut a hole for the mouth and gets a language albal paper.
The ears are also made with paper albal. And the eyes and nose, with plain paper balls. It sticks paper balls and then head over the body, as seen in the photo.
And finally the legs. Do you want your robot to move? Well it is possible!
You just put a car inside of each leg. The legs are made with the inner rolls. Look at the picture to see how they look with the stroller inside.

Activity 2. Jumping Frog
Following the steps we will be able to create this amphibian jumping. We will certainly take some time to do a frog jump well, but the results will be acceptable after a few attempts. We recommend getting green paper to bring realism to the figure. The more rigid the frog jumps role.
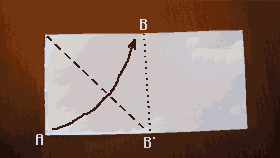
1. To make the frog jumping need a square sheet divided into two parts, with each of these can make a jumping frog. From now on, we will make the entire process with one of these parts. We can use the other to repeat the frog.

2. We folded in half (line CC '), undo and return it to bend each of the halves generated (lines AA' and BB ') through its center.

3. Then one half fold (left part BB ') by a diagonal and rid.
4. Repeat the same process but with the other diagonal.

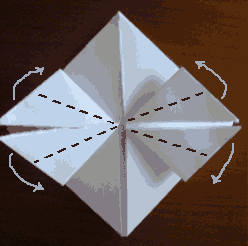
5. Guiding the folds formed by the diagonals A and B unite so that I D overlap with G, I F, E to H and C in the central intersection remains a point.

6. We repeat the last three steps with the other half to get the figure below.

7. We rounded the corners A and B by the center to C. Do the same with the other corners D and E to F.

8. Go back to fold each of the four corners to the middle to the opposite side.
9. As a result we get the following figure.

10. We turn to the figure and turned toward the center one of the peaks between the legs making sure it is as straight as possible, it depends on the leap frog.

11. To give the final shape must join sides with overlaying the peak center have doubled as shown in the picture below.

12. We again turn to the figure. Fold in half (the dashed line in the figure) connecting the legs.

13. We turned the top half to the left.

14. The edges should match best to the frog jump well.

15. We have made our jumping frog. To make it jump, pressed back and let go.Must be done quickly to get a good jump! The smaller, the better chip, but will also make it more difficult.

¡If you missed during the process, don't worry, click on the photo and you can access a video tutorial on creating your Jumping Frog!
